

Spray Gun Spitting Paint? 7 Causes & Quick Fixes (Pilot & HVLP)
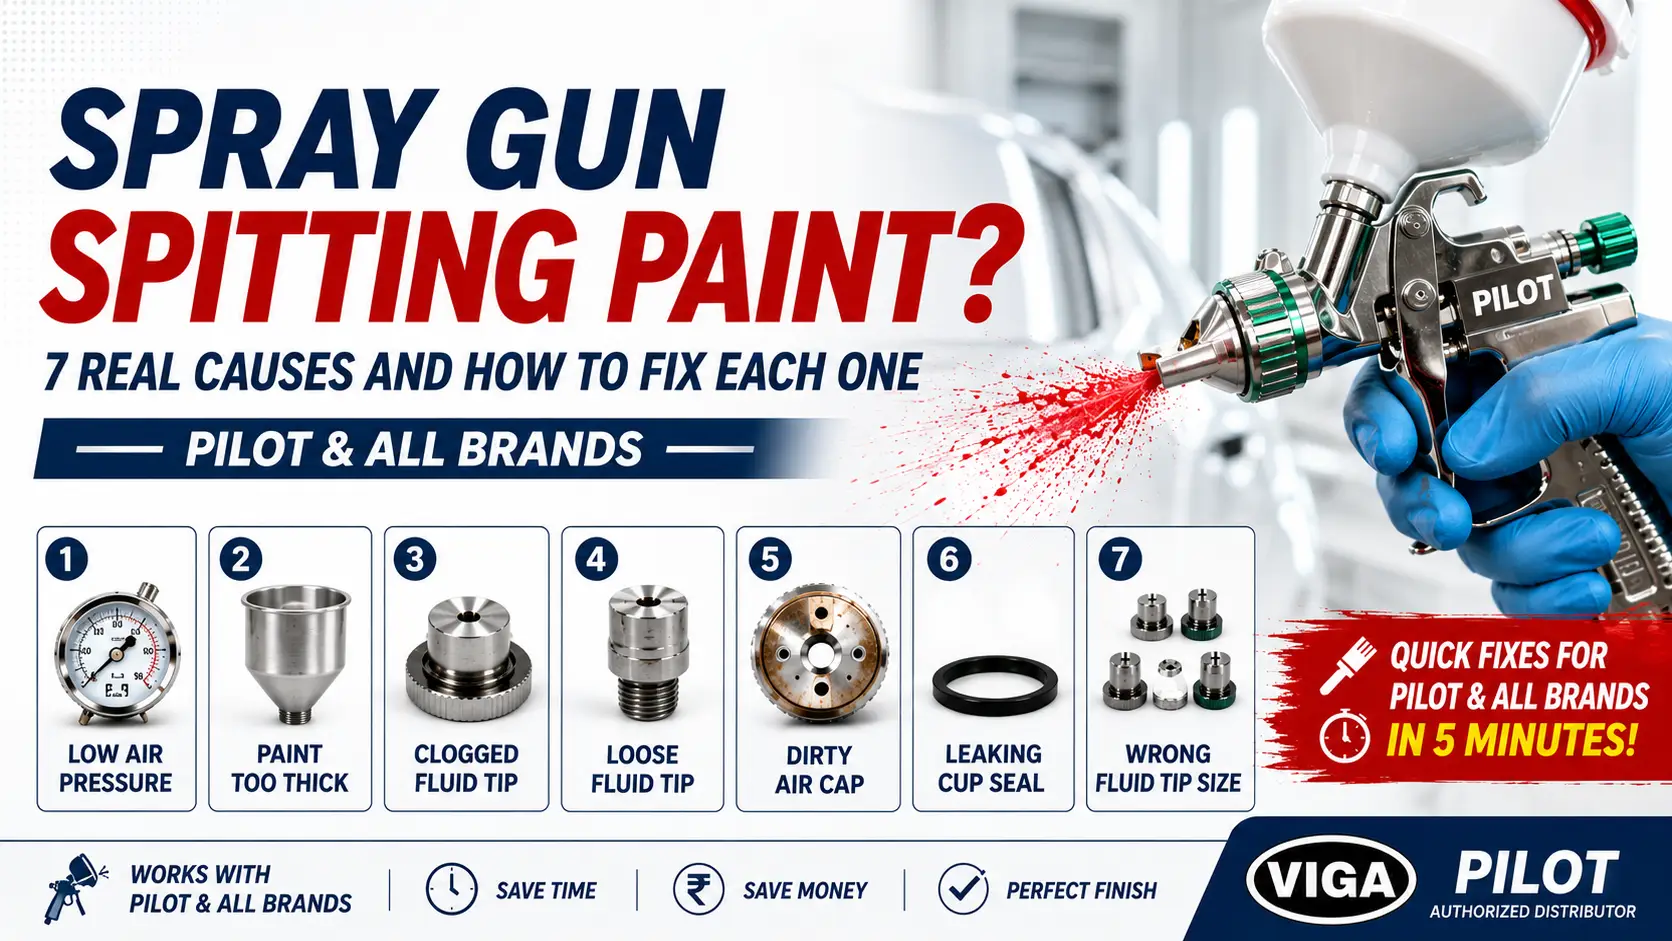
Spray Gun Spitting Paint? 7 Real Causes and How to Fix Each One (Pilot & All Brands)
Spray gun spitting is almost always one of 7 fixable problems. The good news — most of them take under 5 minutes to solve, without any tools beyond the cleaning kit that came with the gun.
A spitting spray gun ruins finish work in seconds. The painter sets up for a clean coat on an automotive panel, presses the trigger, and instead of an even fan, the gun delivers droplets, streaks, blobs, or a wet edge that runs straight down the panel. Job becomes a rework. Schedule slips. Material wasted.
Auto body shops across Okhla and Mayapuri see this daily. Furniture polishing units in Kirti Nagar deal with it every shift. Metal finishing operations in Wazirpur lose production hours chasing spitting issues that the painter could fix faster than the supervisor can call for a replacement gun. The pattern is the same everywhere — the spray gun usually isn’t broken. Something around the gun needs five minutes of attention.
The seven causes below cover roughly 95% of all paint spray gun troubleshooting cases on Pilot, HVLP, and conventional spray guns across Indian workshops. Run through them in order. The fix usually surfaces by Cause 3.
What “Spitting” Actually Means at the Nozzle
Before fixing it, identify it properly. Painters use “spitting” loosely to describe several different failure patterns. Each one points to a different root cause.
True spitting — droplets and large paint particles leaving the gun mixed with the fine atomized spray. Atomization is failing intermittently. Either air isn’t breaking the paint into a fine mist consistently, or paint is entering the air passages where it shouldn’t be.
Pattern imbalance — one heavy edge, one light edge. Not spitting. Air cap horn holes are clogged or the cap is worn.
Pulse-pattern delivery — strong-weak-strong-weak. Air pulsation from a compressor that can’t keep up, or air leaking into the paint feed.
Coarse atomization throughout — paint is mist but the mist is too coarse, finish has orange peel. Atomizing air pressure is wrong, paint is too thick, or air cap is delivering reduced flow.
Identifying the failure pattern first narrows the seven causes to the right two or three. Saves time.
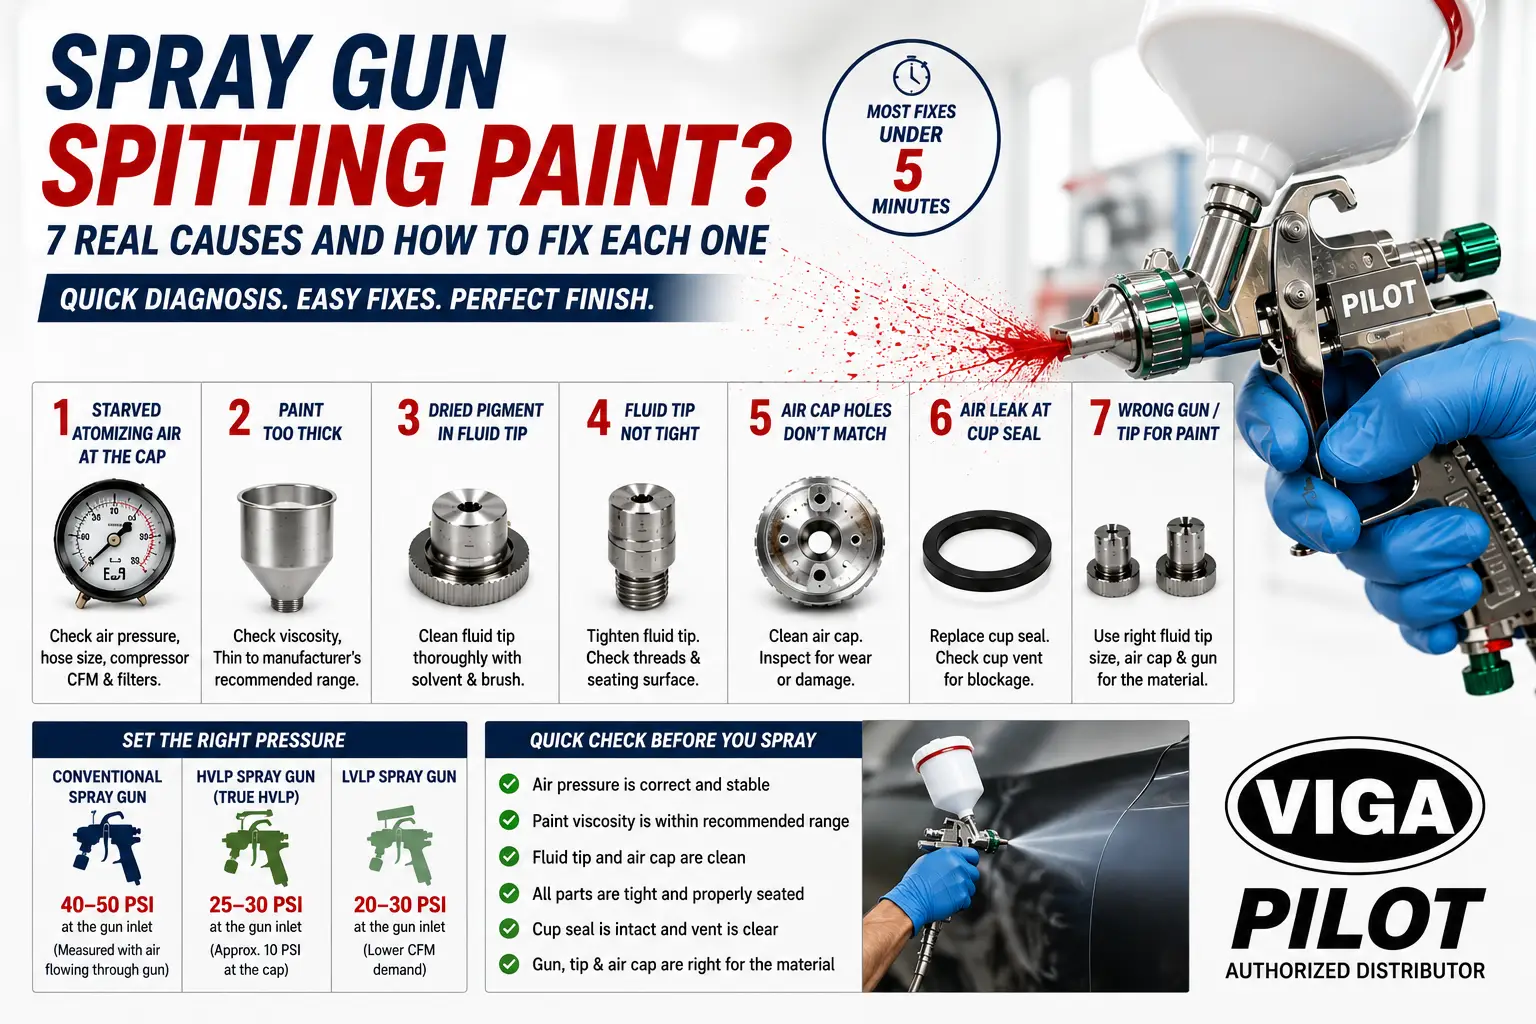
1. Starved Atomizing Air at the Cap
The most common cause across Indian workshops by a wide margin. Spray gun atomization is air-dependent. If pressure at the cap drops — even briefly during a stroke — atomization collapses and paint comes out as droplets instead of mist.
Common reasons atomizing air gets starved:
— Compressor undersized for the gun’s CFM requirement — Inlet pressure correct at regulator, but undersized air line dropping pressure under flow — Regulator set too low at the gun inlet — Filter or moisture separator fouled, restricting airflow — Quick coupler creating an unexpected pressure drop (some couplers drop 5-8 PSI under full flow) — Air receiver tank too small to sustain continuous trigger pull — Tank pressure dropping faster than compressor can recover between cycles
Diagnostic is fast. Trigger the gun without paint and listen. A steady, even hiss of air at full trigger pull means the supply is fine. A waxing-waning sound or a stuttering airflow points to compressor or supply problems before the gun is even part of the equation.
Setting the Right Pressure at the Gun
The pressure on the regulator gauge isn’t the pressure at the cap. Most painters miss this. Air pressure drops between the regulator and the gun based on hose length, hose diameter, and flow rate. A regulator showing 50 PSI at the wall delivers significantly less at the gun under flow.
Conventional spray gun: 40 to 50 PSI at the gun inlet — measured at the gun with air actually flowing through it.
HVLP spray gun (true HVLP): 25 to 30 PSI at the gun inlet, delivering roughly 10 PSI at the cap. Above 10 PSI at the cap and the gun loses its HVLP classification — more bounce-back, lower transfer efficiency, more material waste.
LVLP spray gun: 20 to 30 PSI at the gun inlet, lower CFM demand than HVLP.
A small inlet pressure gauge that screws onto the gun air inlet solves the guesswork for under ₹500 and pays for itself the first time the gun gets blamed for a compressor problem.
2. Paint That’s Fighting the Atomizer
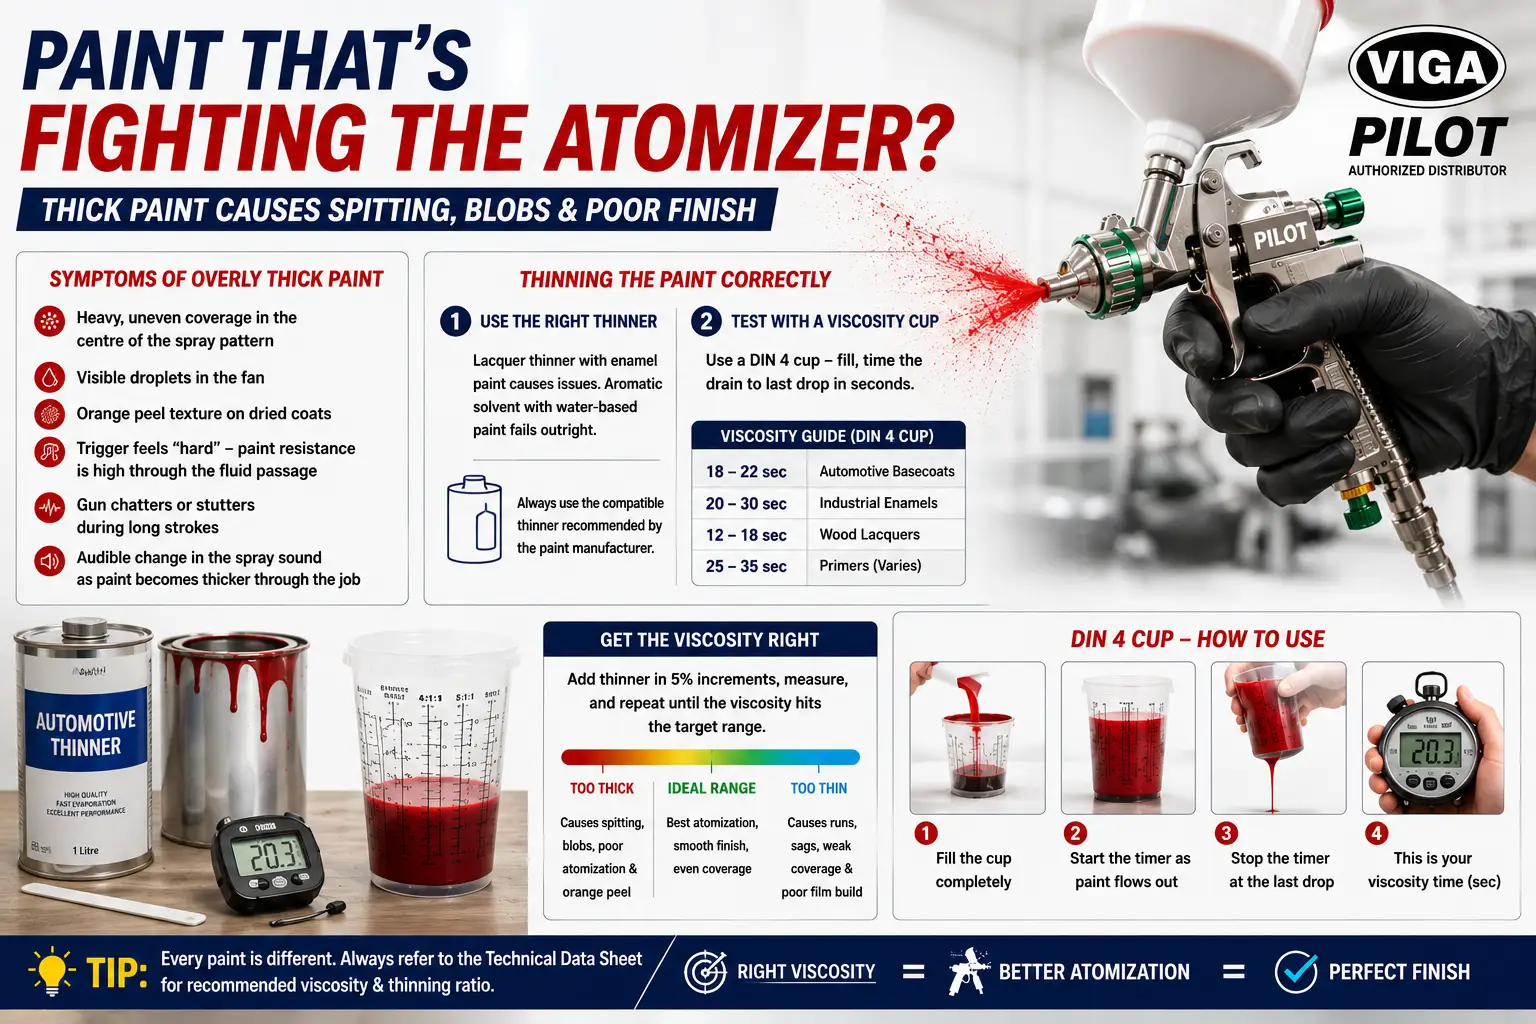
If the spray gun is working hard to atomize the paint, expect spitting. Paint that’s too thick won’t break into fine particles cleanly — the gun delivers blobs and droplets along with the mist.
Standard symptoms of overly thick paint:
— Heavy, uneven coverage in the centre of the spray pattern — Visible droplets in the fan — Orange peel texture on dried coats — Trigger feels “hard” — paint resistance is high through the fluid passage — Gun chatters or stutters during long strokes — Audible change in the spray sound as paint becomes thicker through the job
Every paint type has a recommended viscosity range. Automotive basecoats run thinner than industrial enamels. Wood stains thinner than two-pack polyurethane. Primers vary widely depending on type. The paint manufacturer’s technical data sheet specifies it — usually as a viscosity range measured with a DIN 4 cup or Ford 4 cup.
Thinning the Paint Correctly
Two rules catch most thinning mistakes.
Use the right thinner. Lacquer thinner with enamel paint causes issues. Aromatic solvent with water-based paint fails outright. The paint data sheet specifies the compatible thinner — using anything else is gambling on the finish.
Mix in steps, test with a viscosity cup. A DIN 4 cup is the cheap and reliable tool — fill, time the drain to last drop in seconds. Most automotive paints spray correctly at 18 to 22 seconds through DIN 4. Industrial enamels often spray at 20 to 30 seconds. Wood lacquers thinner still. The data sheet number is the target.
Add thinner in 5% increments, measure, repeat until the viscosity hits spec. Going too thin causes its own problems — runs, sags, poor film build, weak coverage. Going too thick causes the spitting. The middle range is where the gun delivers its best work.
3. Dried Pigment in the Fluid Tip
Every spray gun develops dried paint inside the fluid passages between jobs. The fluid tip — the small precision orifice that meters paint into the air stream — is the first place buildup creates problems.
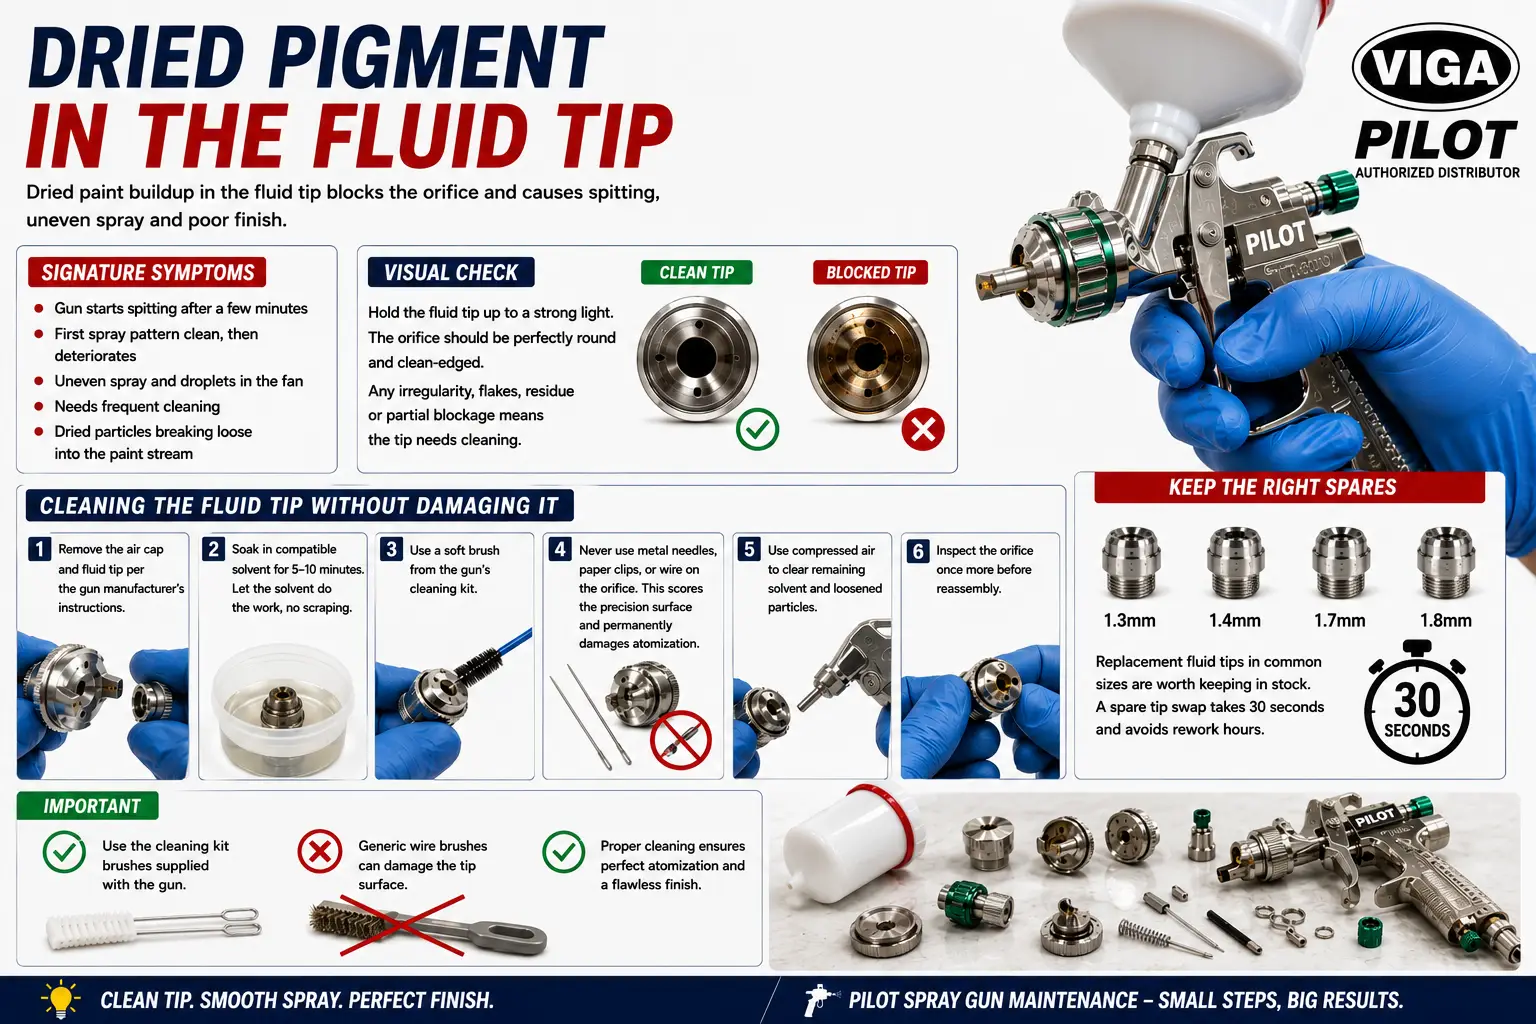
Signature symptoms: gun starts spitting after a few minutes of work, or right after the gun has been sitting briefly between coats. First spray pattern of the morning is clean, then deteriorates over the next half hour. Fluid tip is partially blocked and dried particles are slowly breaking loose into the paint stream.
Visual check: hold the fluid tip up to a strong light. The orifice should be perfectly round and clean-edged. Any irregularity in the opening — flakes, residue, partial blockage — means the tip needs cleaning before the next coat goes on.
Cleaning the Fluid Tip Without Damaging It
— Remove the air cap and fluid tip per the gun manufacturer’s instructions — Soak in compatible solvent for 5 to 10 minutes — let the solvent do the work, no scraping — Use a soft brush from the gun’s cleaning kit — Never use metal needles, paper clips, or wire on the orifice — this scores the precision surface and permanently damages atomization — Compressed air to clear remaining solvent and loosened particles — Inspect the orifice once more before reassembly
The cleaning kit that came with the gun has the right-sized brushes. Generic wire brushes from a hardware shop damage the tip surface. The damage isn’t visible to the eye immediately, but the spray pattern is never quite the same after metal contact with the orifice surface.
For Pilot spray gun maintenance specifically, replacement fluid tips in common sizes (1.3mm, 1.4mm, 1.7mm, 1.8mm) are worth keeping as workshop stock. A spare tip swap takes 30 seconds and avoids rework hours.
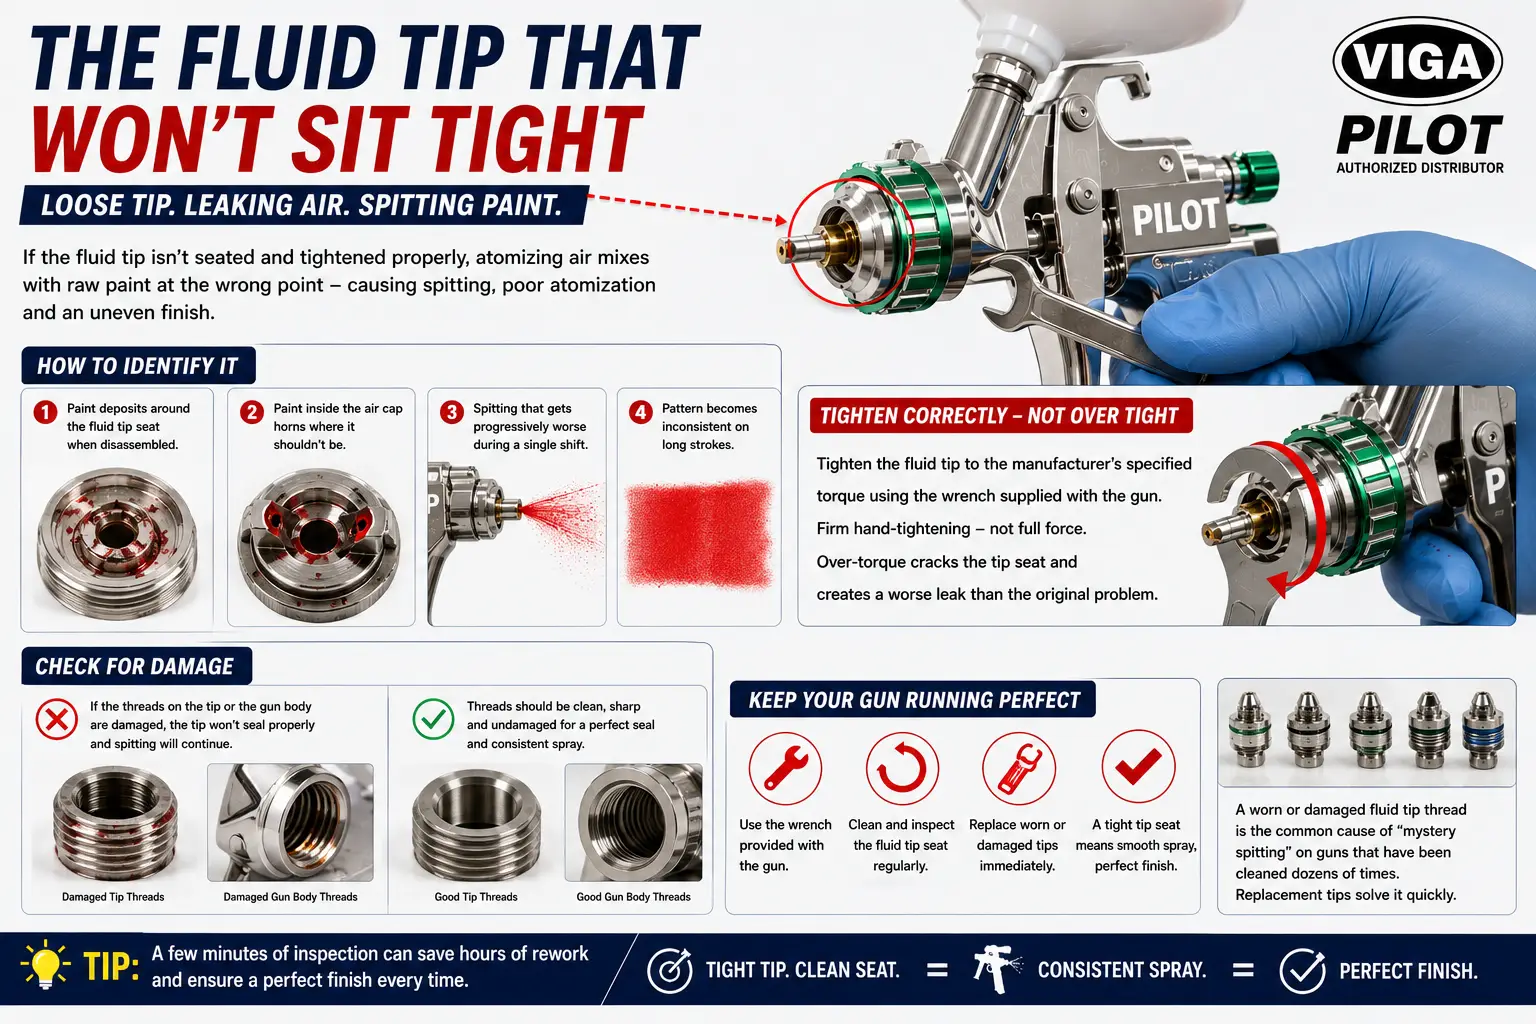
4. The Fluid Tip That Won’t Sit Tight
Easy one to miss. The gun looks fine externally. The fluid tip seems to be in place. But something has loosened the seat — vibration during use, multiple cleaning cycles, or thread wear — and the tip is no longer sealing properly against the gun body. Atomizing air mixes with raw paint at the wrong point and the gun spits.
How to identify it:
— Paint deposits around the fluid tip seat when the gun is disassembled — Paint inside the air cap horns where it shouldn’t be (a dead giveaway) — Spitting that gets progressively worse during a single shift’s work — Pattern becomes inconsistent on long strokes especially
Tighten the fluid tip to the manufacturer’s specified torque using the wrench supplied with the gun. Firm hand-tightening — not full force. Over-torque cracks the tip seat and creates a worse leak than the original problem.
Check the threads on both the tip and the gun body for damage. If the seat surface inside the gun body is scored or worn, no amount of tightening fixes it — the gun needs proper service or the body itself is finished.
A worn or damaged fluid tip thread is the common cause of “mystery spitting” on guns that have been cleaned dozens of times. Replacement tips solve it quickly.
5. Air Cap Holes That Don’t Match Anymore
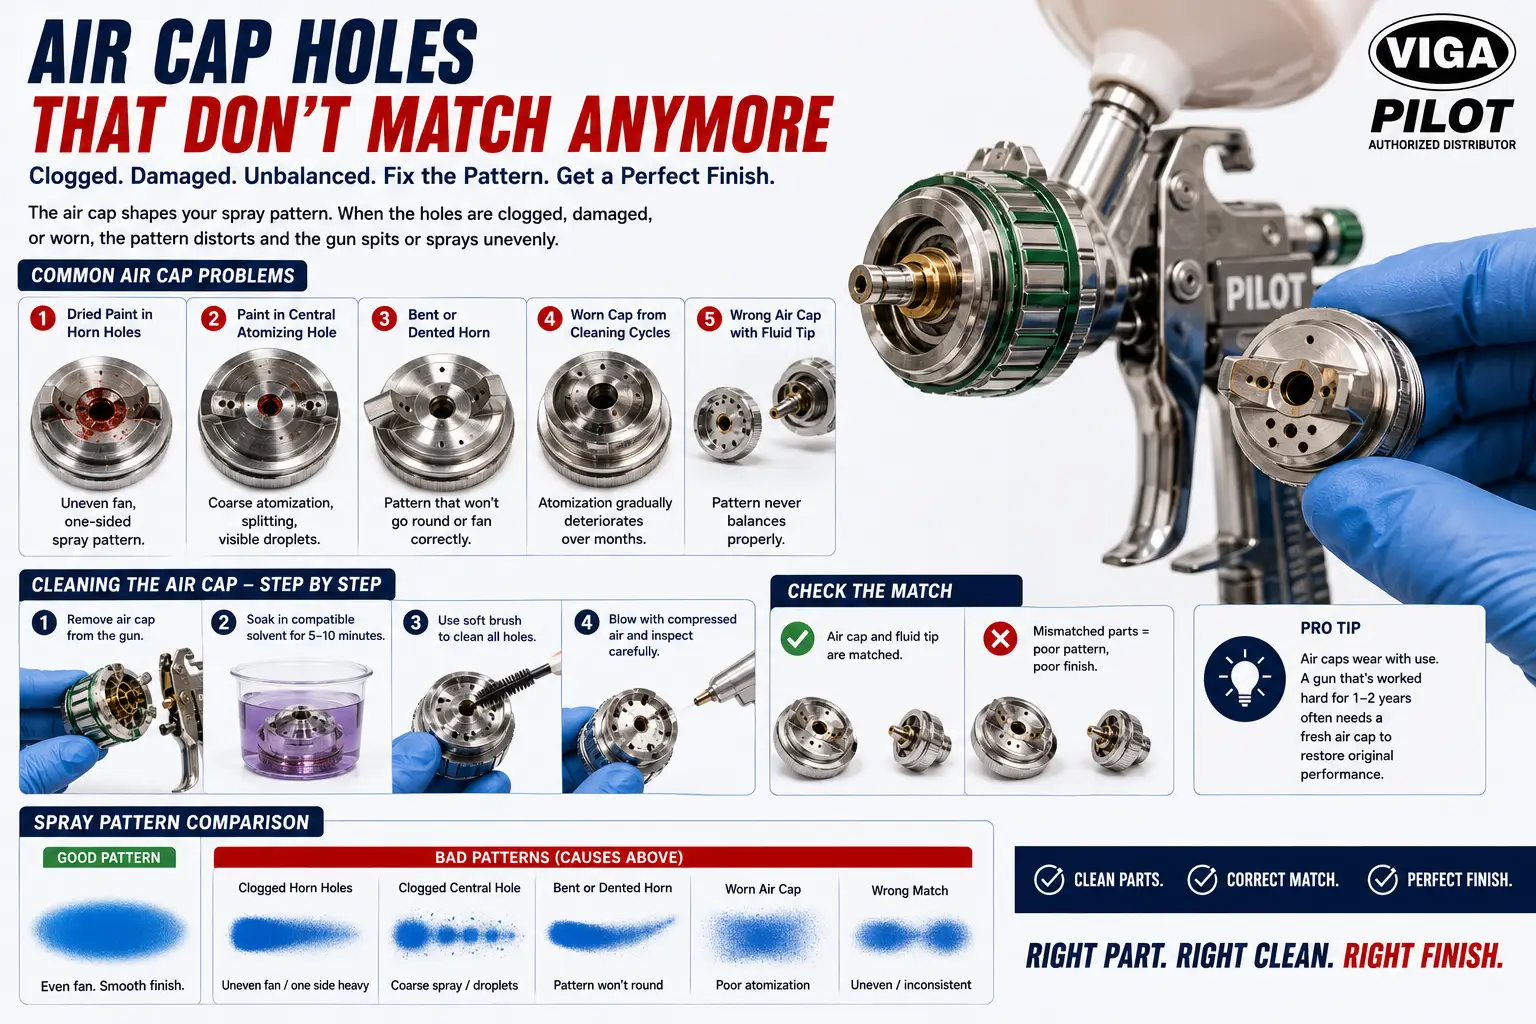
The air cap is the precision-machined part at the very front of the gun — the one with the wing horns and the central atomizing hole. It has multiple precisely-sized holes that shape the spray pattern. When those holes get partially clogged or damaged, the pattern goes wrong, and what looks like spitting is actually pattern distortion.
Common air cap problems:
— Dried paint in the horn holes — uneven fan, one-sided spray pattern — Paint in the central atomizing hole — coarse atomization, droplets — Bent or dented horn — pattern that won’t go round or fan correctly — Worn cap from years of cleaning cycles — atomization gradually deteriorates over months — Wrong air cap paired with the fluid tip — pattern never balances properly
The fix for clogging mirrors the fluid tip method — soak, soft brush, compressed air, careful inspection. The fix for physical damage is replacement. Air caps wear with use. A spray gun working hard for two years often needs a fresh air cap to restore original performance.
Worth checking the cap match. Air caps and fluid tips are designed as matched pairs. Mixing a fluid tip from one set with an air cap from a different set rarely works well — the airflow geometry is off, and the spray pattern reflects it for the entire job.
6. Air Drinking Through the Cup Seal
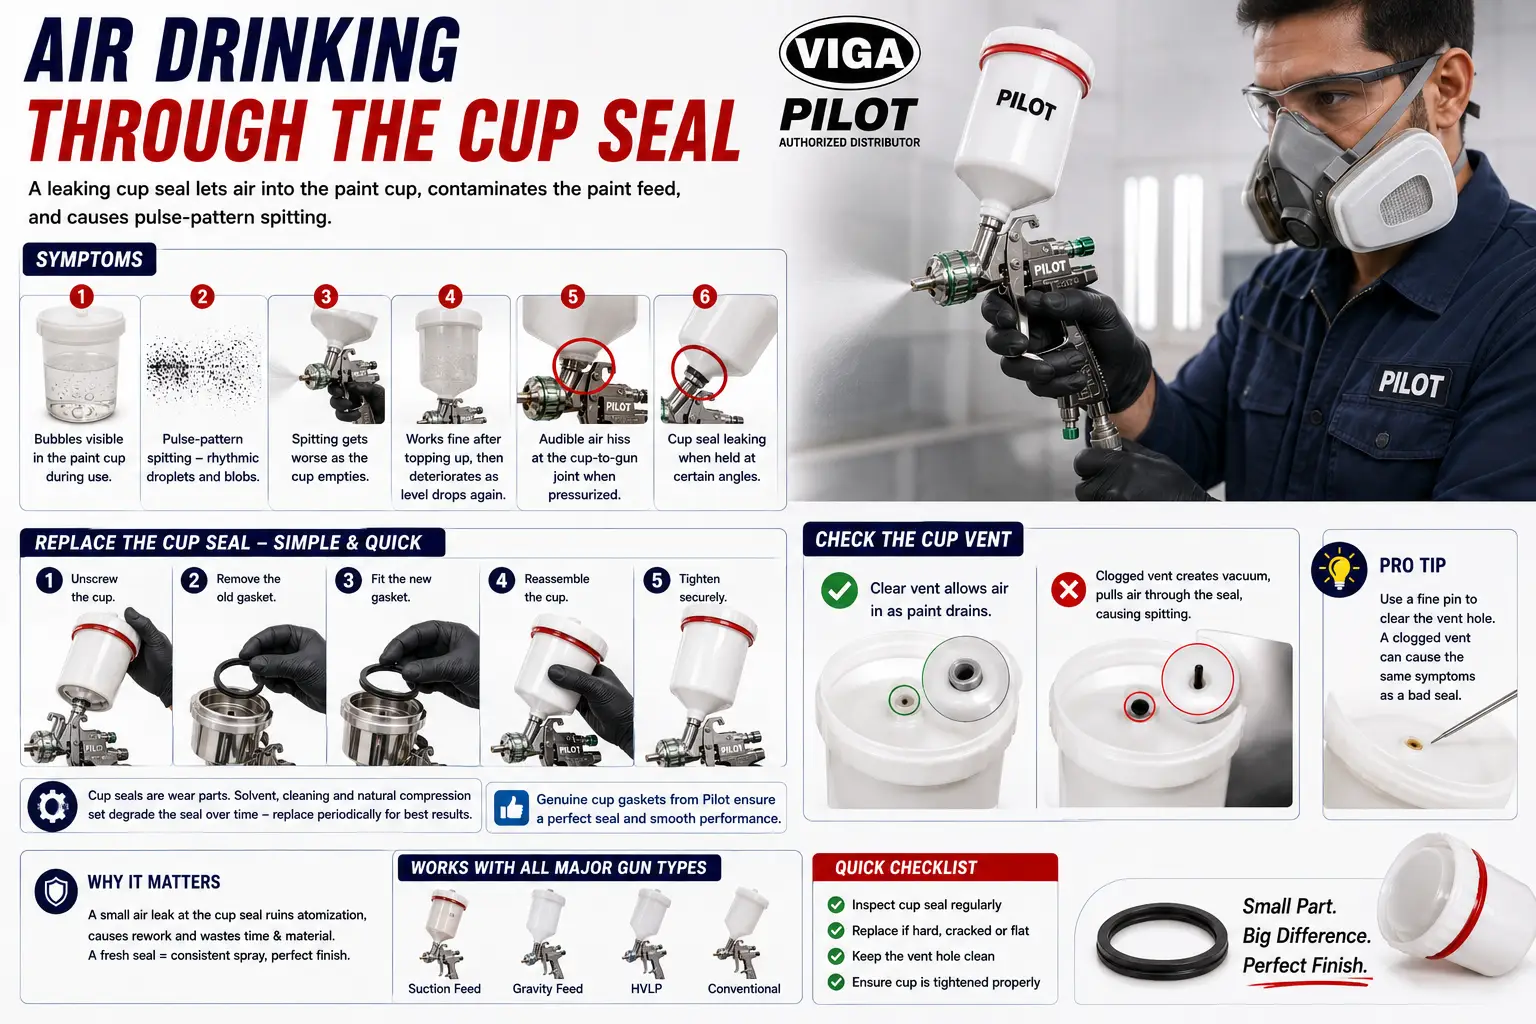
For suction-feed and gravity-feed spray guns with a paint cup, the seal between the cup and the gun body is critical. A leaking cup seal lets air enter the paint cup, that air contaminates the paint feed, and the gun delivers pulse-pattern spitting.
Symptoms are specific and easy to identify:
— Bubbles visible in the paint cup during use — Pulse-pattern spitting — rhythmic delivery of droplets and blobs — Spitting that gets worse as the cup empties — Gun functions fine briefly after the cup is topped up, deteriorates as level drops again — Audible air hiss at the cup-to-gun joint with the cup pressurized — Spray gun cup seal leaking visibly when held at certain angles
The cup seal is a wear part. Many painters never replace it through the working life of the gun, and then can’t understand why the gun “started spitting on its own.” Solvent attack, repeated cleaning, and the natural compression set of the rubber all degrade the seal over time.
Replacement is one of the simplest spray gun repairs. Unscrew the cup, remove the old gasket, fit the new one, reassemble. Most spray gun brands — Pilot included — supply replacement cup gaskets as standard service parts. For HVLP spray gun spitting that appears after years of use, the cup seal sits high on the list of suspects.
Also worth checking — the cup vent. Gravity-feed cups have a small vent hole on the lid that lets air in as paint drains. A clogged vent creates vacuum inside the cup, which then pulls air through any joint that’s available, including the cup seal. Clear the vent with a fine pin and the symptoms often disappear without even replacing the gasket.
7. When the Gun Was Never Right for the Paint
Last cause on the list. Worth ruling in or out when nothing else fits.
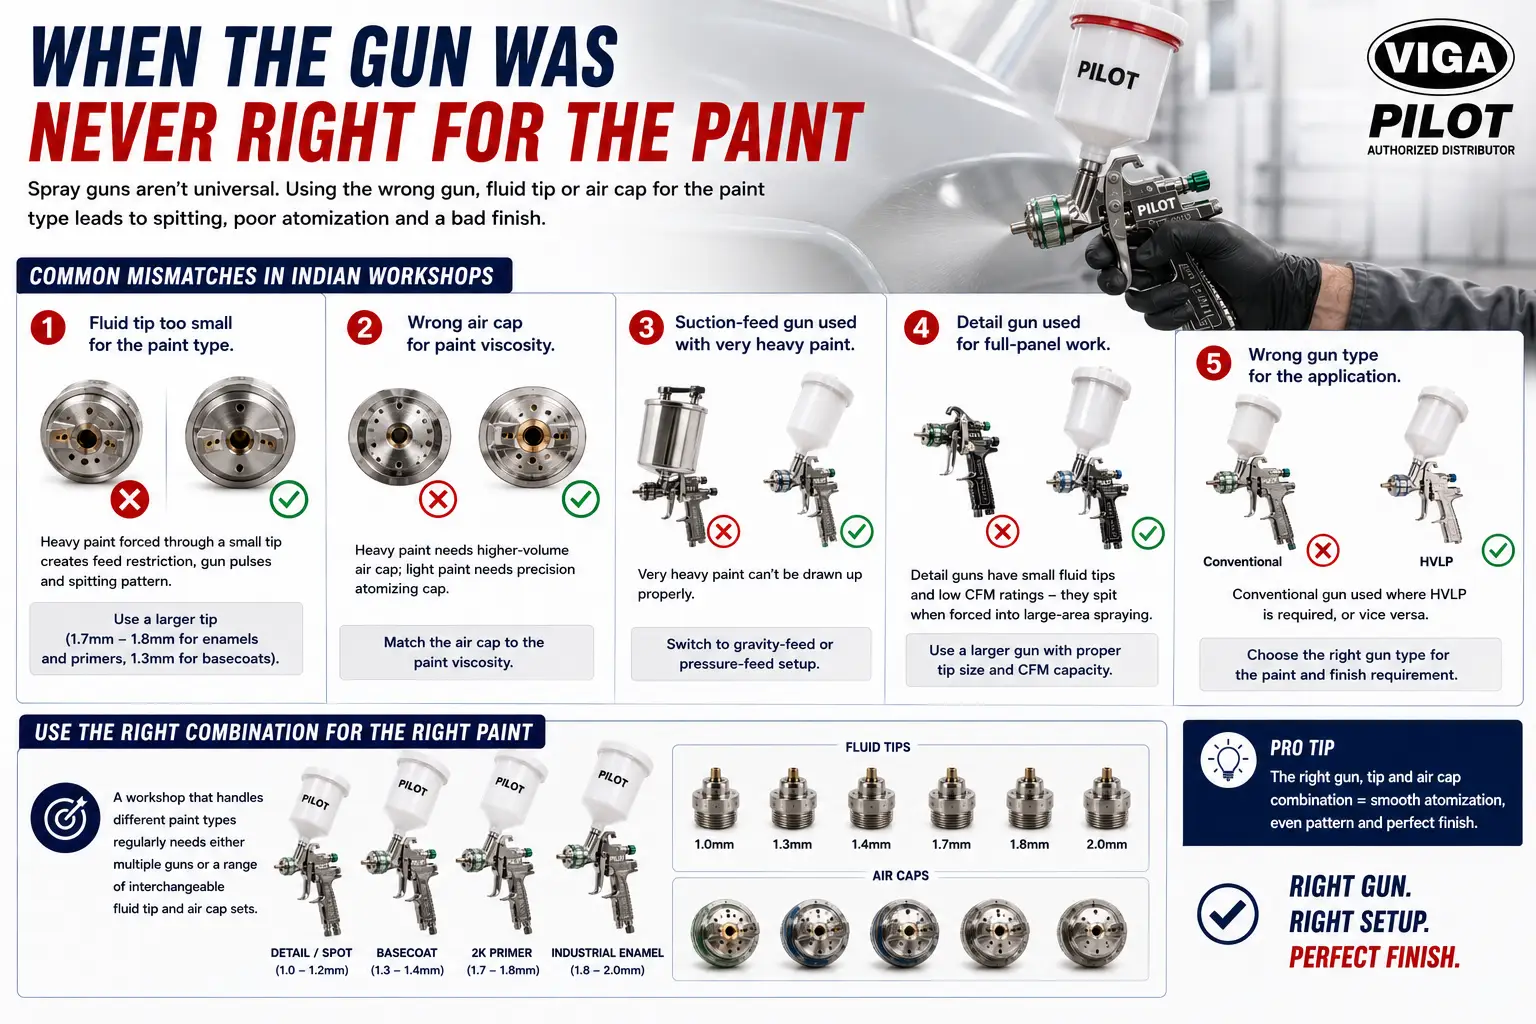
Spray guns aren’t universal tools. A gun optimized for thin automotive basecoats won’t atomize heavy industrial enamel cleanly. A small detail gun struggles with high-build primers. An HVLP gun designed for low-viscosity finishes spits when used with thick textured paint.
Common mismatches in Indian workshops:
— Fluid tip too small for the paint type. Heavy paint forced through a small tip creates feed restriction, gun pulses, spitting pattern. A larger tip (1.7mm or 1.8mm for most enamels and primers, versus 1.3mm for basecoats) solves it cleanly. — Wrong air cap for paint viscosity. Heavy paint needs higher-volume air cap; light paint needs precision atomizing cap. Mismatch causes constant pattern issues. — Suction-feed gun used with very heavy paint that can’t be drawn up properly. Switch to gravity-feed or pressure-feed setup. — Detail gun used for full-panel work. Detail guns have small fluid tips and low CFM ratings — they spit when forced into continuous large-area spraying. — Conventional gun used where HVLP is required, or vice versa. Different paint types behave differently under different atomizing pressures.
A workshop running mixed paint types regularly needs either multiple guns or a single gun with a range of interchangeable fluid tip and air cap sets. Trying to do every job with one tip-and-cap combination is what creates constant spitting and pattern problems across an otherwise capable workshop.
Spray Gun Maintenance Checklist to Prevent Spitting
Routine maintenance catches most spitting causes before they happen. The painter’s daily and weekly schedule that prevents spit problems:
End of every spraying session:
— Flush the fluid passages with compatible solvent — Wipe down the gun exterior, particularly around the air cap and fluid tip — Visual check on the air cap and fluid tip for surface buildup — Drain compressor receiver of accumulated water and oil
End of every week:
— Disassemble and clean fluid tip and air cap thoroughly — Inspect each part for wear, corrosion, scoring — Check needle packing tightness — Test trigger feel — should be smooth, no stickiness, full travel — Verify air supply filter and water separator condition — Replace inline filter element if discoloured
Every month:
— Replace cup seal if any sign of degradation, discolouration, or compression set — Inspect fluid passages for paint buildup at internal corners — Check fluid tip and air cap thread condition — Verify needle tip condition (no scoring, clean point, no bend) — Test fan adjustment and pattern adjustment movement through full range
Quarterly:
— Lubricate trigger and needle movement with proper gun oil — not penetrating oil, not WD-40, only spray gun lubricant — Inspect all gaskets and seals — Pressure-test gun air passages for hidden leaks
A well-maintained spray gun delivers consistent results for years. A neglected gun starts spitting within weeks regardless of how much was paid for it originally.
Spray Gun Spitting Reference Table
Symptom | Most Likely Cause | First Action |
Spitting starts after a few minutes of work | Dried pigment in fluid tip | Clean fluid tip |
Heavy droplets in centre of pattern | Paint too thick | Check viscosity, thin if needed |
One-sided fan pattern | Air cap horn clogged | Clean both horn holes |
Pulse-pattern spitting | Air leak at cup seal | Replace cup gasket |
Pattern deteriorates as cup empties | Cup vent clogged or seal leak | Clear vent, check seal |
Coarse atomization throughout pattern | Air pressure too low at cap | Measure inlet pressure under flow |
Spitting worse on long continuous strokes | Compressor can’t keep up with demand | Check tank size and CFM rating |
Fluid tip leaking paint into air horns | Fluid tip loose or threads worn | Tighten or replace tip |
Spray pattern won’t go round | Bent or worn air cap | Inspect cap visually, replace if damaged |
Spitting on a gun just cleaned | Cleaning damaged the fluid tip surface | Replace fluid tip and air cap set |
Bubbles visible in paint cup | Cup seal leaking | Replace cup gasket |
Air hiss at cup joint | Cup seal failed | Replace gasket immediately |
FAQ
Q1. Is spitting caused by the gun or the compressor?
Both are real possibilities. A starved or pulsing air supply causes spitting that looks identical to gun-side problems. Quick test: remove the paint cup, trigger the gun with air only, and listen carefully. Steady even hiss means the compressor and air supply are fine — fault is in the gun. Stuttering, weakening, or surging air confirms the compressor or supply line is the issue. Many small workshop compressors are simply undersized for continuous spraying — tank pressure drops during sustained trigger pull, and the gun spits because the air supply is collapsing during the stroke.
Q2. How often should the spray gun be cleaned?
After every spraying session, minimum. Flushing the fluid passages with solvent at the end of each working day prevents 90% of buildup problems. Weekly disassembly and proper cleaning of the fluid tip and air cap catches buildup that solvent flushing misses on its own. Monthly inspection of seals, gaskets, and wear surfaces catches problems before they become spitting symptoms. Painters who clean rarely and then condemn the gun when it starts spitting are creating the problem themselves.
Q3. Can a worn nozzle be replaced or does the whole gun need replacement?
Almost always replaceable. Fluid tips, air caps, needles, and cup gaskets are standard service parts on most quality spray guns including the Pilot range. A worn or damaged nozzle gets swapped out in minutes. The whole gun only needs replacement if the gun body itself is damaged — cracked, severely worn at the fluid tip seat, or with corroded air passages. For 90% of “gun is finished” situations, a fresh fluid tip and air cap set restores the gun to like-new performance.
Q4. Why does the HVLP spray gun spit when a conventional gun works fine on the same paint?
HVLP guns operate at much lower cap pressure than conventional guns — typically 10 PSI at the cap versus 30+ PSI for conventional. Lower cap pressure means less atomizing force, which makes HVLP guns more sensitive to paint viscosity. Paint that’s slightly thick for a conventional gun is far too thick for an HVLP gun. Thin the paint more aggressively for HVLP work — check the data sheet specifically for HVLP viscosity, which is often 15 to 18 seconds DIN 4 versus 18-22 seconds for conventional spraying.
Q5. The spray pattern is good in the centre but heavy on the edges — what’s wrong?
That’s pattern imbalance, not true spitting. The cause is uneven airflow through the horn holes on the air cap. Either one horn is clogged (more common) or the cap is worn unevenly across the holes. Clean both horn holes with the cleaning kit brush and check the fan again. If the pattern is still uneven after cleaning, the cap is worn and needs replacement.
Q6. The gun was working fine and suddenly started spitting mid-job — what changed?
The most common cause of sudden mid-job spitting is the fluid tip becoming partially clogged with a flake or particle that’s been sitting in the paint. Paint that’s been sitting in the gun for 10-15 minutes between coats is more prone to this than fresh paint going through immediately after mixing. The fix is fast: stop, depressurize, remove the air cap and fluid tip, soak briefly, brush gently, reassemble. Three minutes of work versus an entire job ruined by bad finish.
Pilot Spray Guns and Accessories — Authorized Distribution in Delhi NCR
For workshops in Delhi NCR needing replacement parts, complete accessory sets, or new Pilot spray guns, VIGA holds working stock at the Chawri Bazar location.
The shelf usually carries the popular Pilot models in working depth — the Type 59 and Type 64 series for general and automotive work, the Type 68 for finishing, the HVLP and HP series for high-transfer-efficiency applications, the E-88 electric spray gun for cordless work, and the AB airbrush range for detail and scale work. Fluid tip sets in common sizes — 1.3mm through 1.8mm — sit ready for over-the-counter pickup. Air caps, needle sets, cup gaskets, and complete service kits stay in stock because workshops in Okhla, Wazirpur, Kirti Nagar, and Mayapuri order them on a regular cycle. Cleaning kits and replacement brushes are kept as well, since damaged kit brushes are a leading hidden cause of spray gun problems.
Vinod Gautam Sales (VIGA) operates from 20, Chawri Bazar, Delhi — 110006. Phone lines are +91-11-43025959 and +91-11-41582888. Email goes to [email protected] or [email protected]. The website is viga.in.
Walk-ins are welcome at the Chawri Bazar location. For workshops that can’t visit, calling directly is the fastest way to confirm stock and arrange dispatch. Delhi orders get same-day delivery on stocked items. Noida, Gurgaon, Faridabad, Ghaziabad and the rest of NCR usually next-day, same-day if the order lands in the morning.
VIGA is an authorized distributor for Pilot spray guns and pneumatic equipment, alongside WIKA, Mass Instruments, Switzer, Indfos, Uflow, Shavo, and Electropneumatics across Delhi NCR.